Power BI has the capability to filter data by user. One of the ways to do this is by using the email address of the user that is signed in to Power BI using the UserPrincipalName() DAX function.
This can be done using a SQL table, CSV file, SharePoint list, etc. to manage what users have access to. In this example I'll use a SQL table with a foreign key constrain to my crm.Contacts table to manage which contacts a user has access to.
Step 1. Create a SQL table for Row Level Security.
Step 2. Add records to the pbi.RowLevelSecurity table.
INSERT INTO pbi.RowLevelSecurity(EmailAddress,ContactID) VALUES ('bespencer1@gmail.com',5);
Step 3: Add the pbi.RowLevelSecurity table to your Power BI dataset. Do this in Power BI Desktop
let
Source = Sql.Database(".", "MyDB"),
pbi_RowLevelSecurity = Source{[Schema="pbi",Item="RowLevelSecurity"]}[Data]
in
pbi_RowLevelSecurity
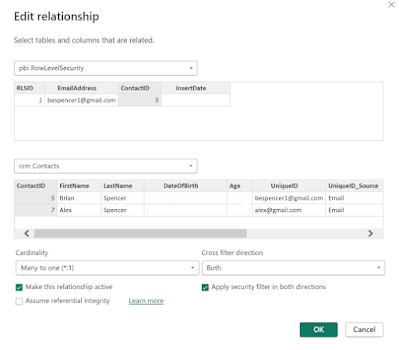
Step 4. Create the relationship between pbi.RowLevelSecurity and the crm.Contacts table.
PowerBI will automatically do this for you if you have a Foreign Key in SQL Server.
Set the relationship to "Both" cross filter direction and check the "Apply security filter in both directions".
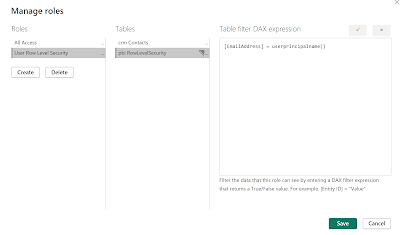
Step 5. Create a Power BI Role and add this table filter on pbi.RowLevelSecurity
[EmailAddress] = userprincipalname()
Step 6. Test the Row Level Security confirmation using the "View as" option.
Check the box beside the role you created in the previous step and check the box beside Other user.
Enter the email address of the user you want to test and click OK. Power BI is not applying the Row Level Security filter to your data.
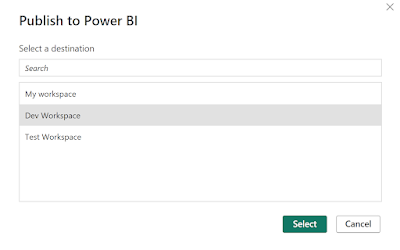
Step 7. Publish to Power BI Online.
Publish the Power BI report to Power BI Online using the "Publish" button in Power BI Desktop.
Step 8: Grant users Viewer access to the Power BI report.
Open the Workspace the Power BI report was published to. Click the Manage Access button and add users with "Viewer" access to the workspace. You can also grant users Viewer access to the Power BI report only depending on your security needs.
Step 9: Add members to the Row-Level Security role you created.
Open the Workspace the Power BI report was published to. Click the "More Options" button next to the Dataset and select "Security".
On the Row-Level Security screen, select the Row Level Security role you created and "Add" users as members of that role.
Please note that Row-Level Security only works for user with "Viewer" access. Users with elevated access including Member and Admin will have access to all of the data included in the dataset.


